WireGuard with Mikrotik
Important note: The WireGuard VPN is only available starting with RouterOS version 7 — your device must be on this version or higher to be able to create a WireGuard VPN. RouterOS 7 already has a stable production release.
In this tutorial, we'll guide you step by step through configuring WireGuard on your MikroTik device using the graphical user interface.
We'll cover everything from creating the WireGuard interface to configuring peers and adjusting routes and firewall, so you have a clear and complete understanding of the configuration process.
Configuration data
VPN settings are done directly in the system — click here to see how to create the VPN in the system.
After creation, you'll have all the information needed to configure the WireGuard VPN in the VPN listing, as shown in the image below:
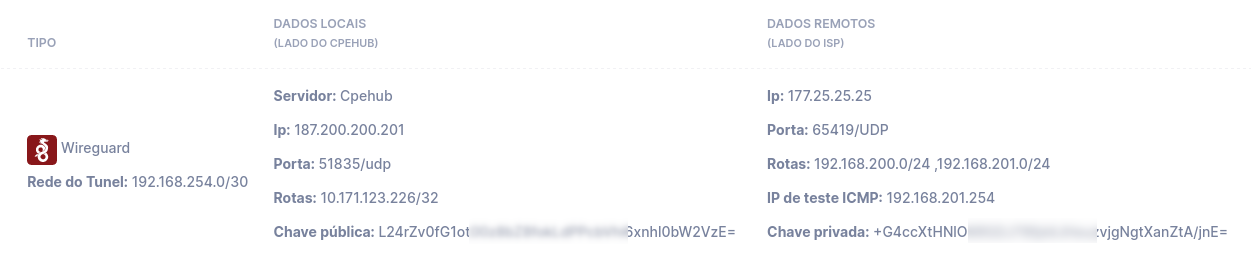
Using the image above, let's build a table with the information needed to configure the VPN on a Mikrotik:
| Variable | Value | Note |
|---|---|---|
| Remote IP | 187.200.200.201 | Cpehub side |
| Remote Port | 51835/udp | Cpehub side |
| Public key | L24rZv0fG1ot[...]6xnhl0bW2VzE= | Cpehub side |
| Remote routes | 10.171.123.226/32 | Cpehub side |
| Tunnel network | 192.168.254.0/30 | |
| Remote peer IP | 192.168.254.1/30 | First IP of the Tunnel Network (Cpehub side) |
| ISP peer IP | 192.168.254.2/30 | Second IP of the Tunnel Network (ISP side) |
| Local Port | 65419/udp | ISP side |
| Private key | +G4ccXtHNl[...]jgNgtXanZtA/jnE= | ISP side |
Performing the configuration
1. Access the management interface
Access your device through Winbox or the web interface
2. Creating the WireGuard Interface
-
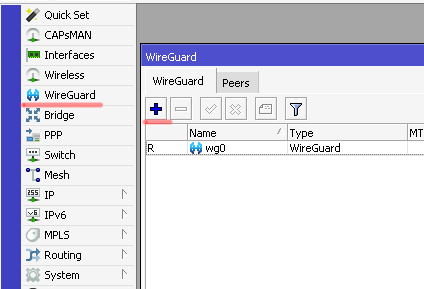
In the main menu, go to the Wireguard menu.
-
Click the + button to add a new interface.
-
In the WireGuard configuration window, enter the required information:
- Name: Give the interface a name, like
wireguard-cpehub. - Listen Port: Enter the
Local Port(in the example above:65419). - Private Key: Enter the
Private key(in the example above:+G4ccXtHNl[...]jgNgtXanZtA/jnE=).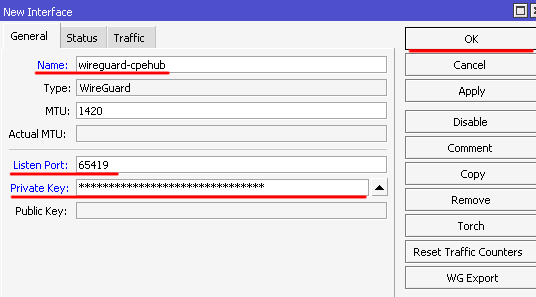
- Name: Give the interface a name, like
-
Click Ok
3. Peer Configuration
-
Go to the Peers tab and click + to add a peer

-
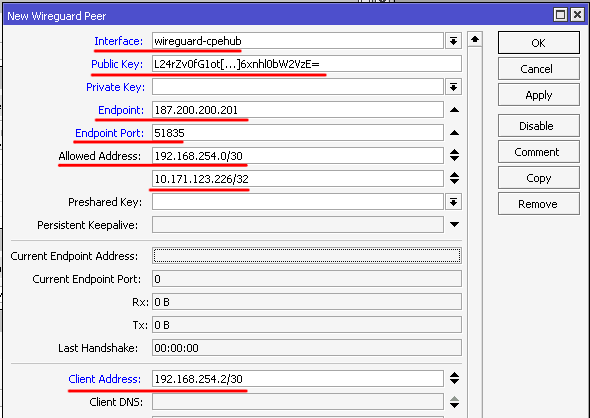
In the Peer configuration window, enter the required information:
- Interface: Select the WireGuard interface created in step 1.
- Public Key: Enter the
Public key(in the example above:L24rZv0fG1ot[...]6xnhl0bW2VzE=) - Endpoint: Enter the
Remote IP(in the example above:187.200.200.201). - Endpoint Port: Enter the
Remote Port(in the example above:51835). - Allowed Address:
- Enter the
Tunnel network(in the example above:192.168.254.0/30). - Enter all the networks from
Remote routes(in the example above:10.171.123.226/32)
- Enter the
- Client Address: Enter the
ISP peer IP(in the example above:192.168.254.2/30).
-
Click Ok
4. Firewall Configuration
-
Go to the IP -> Firewall menu
-
Click + to add a new rule
-
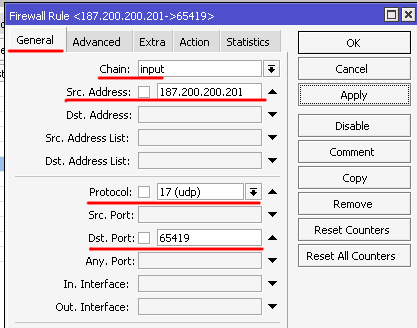
Fill in the information:
- Chain: input
- Src. Address: Enter the
Remote IP(in the example above:187.200.200.201). - Protocol: Enter 17 (udp)
- Dst. Port: Enter the
Local Port(in the example above:65419). - On the Action tab, select Action: accept

-
Click Ok
Important note: In some scenarios, you may need to create a rule allowing forwarding and/or masquerade (NAT) so that the equipment can use the VPN communication.
5. Address Configuration
-
Go to the IP -> Address menu
-
Click + to add a new address
-
Fill in the information:
- Address: Enter the
ISP peer IP(in the example above:192.168.254.2/30). - Interface: Enter the WireGuard interface created earlier (in the example above:
wireguard-cpehub).

- Address: Enter the
-
Click Ok
6. Route Configuration
-
Go to the IP -> Routes menu
-
Click + to add a new route
-
Fill in the information:
- Dst. Address: Enter the first route from
Remote routes(in the example above:10.171.123.226). - Gateway: Enter the
Remote peer IP(in the example above:192.168.254.1).
- Dst. Address: Enter the first route from
-
Click Ok
-
Repeat steps 2, 3, and 4 for all remote routes, always using the same gateway.
Important note: In some scenarios, you may need to create routes on other equipment so that the routing of the other devices knows the path through the VPN.
7. Validation
You can run an ICMP test against the addresses below:
- Remote peer IP: The VPN's IP address on Cpehub/ACS, in the example above 192.168.254.1

- Server IP: Cpehub/ACS's IP address, in the example above 10.171.123.226 (see Cpehub-side Routes)

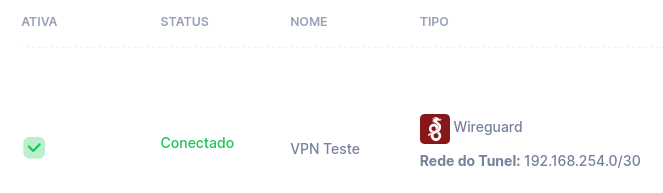
Check the VPNs page — the VPN status should show as Connected
8. Conclusion
After following these steps, WireGuard should be configured and working. Your equipment will now have private communication with the Cpehub or ACS server.
If you run into any difficulty, feel free to contact our support